Atomix Music Ripping Tutorial
Music Ripping Tutorial – Atomix
Note: This is a conversion of the original article in PDF format to blog format, for the people that don't like PDFs. There's nothing new for you here, this is just for people allergic to PDF files. Enjoy!
-- GGN
Intro
This tutorial requires some knowledge of 68000 machine code. Regarding actual music ripping, I was self taught originally on the C64 circa 1988, then I moved to ST. I will try and help where I can – please direct any questions to the blog or via Facebook.
The Basics
A chip music normally has two routines, an initialisation routine which is executed once and a play routine . The init routine normally sets things up , eg muting any current sound and accepting parameters via data address registers to control things like sub-tunes, many files have multiple tunes selectable – such as main music, his-core music, game over music etc.
As mentioned, a music routine needs to be played at regular intervals so the tune is timed. On the ST we have a number of system timers which are synced to the built-in clock :-
VBL (Vertical Blank Line), this routine is executed every frame. On European ST’s this means once every fiftieth of a second (50hz), American ST’s run at once every sixtieth of a second (60hz), this means if we place a sound routine within the VBL routine it will normally play at a steady rate irrespective of what else the machine is doing.
The VBL routine is located at memory location $70 (hexadecimal). It is possible to place your own routine here or latch on to the original system routine. There is also a VBL queue located between $4ce and $4ea, any routine here will also be executed every frame. Note, the location of this queue can be changed, address $456 holds the location.
I will go into other timers MFP & the system DoSound in later tutorials if I get enough feedback!
Sound Chip
The ST sound chip (YM-2149) is located at $fff8800-$fff8802 in memory, so every music player must access and write to these memory addresses to make a sound (excluding STe DMA sample replay or shadow registers – more of those in a later tutorial).
The Tools
For this tutorial I will use the Steem emulator, other emulators are available and of course real ST’s. Nearly all my early rips, in the GZH days were done using MonST.
However for ease of use and to simplify the hacking process I’m using Steem. The tools you will need are :-
- Steem Debug v3.2 – I know later versions and SSE are available, but I like to use the most stable version (unless a game fails on v3.2)
- Devpac (including the MonST machine code monitor)
- Easyrider v4 (disassembler)
- Custom routines – Assembly source to create an SNDH file.
The Game
For this first tutorial I am going to rip the music from Atomix. I’m using this game because it is straight forward. The image of the game I will be using is available here (crack by Hotline).
I will be using Steem Debug 3.2 available here Note: this also includes UK TOS 1.02 , use of other TOS versions may affect the memory locations quoted further on in this tutorial.
So load up Steem Debug, run the game until you see the title screen and the music playing.

You will notice when you use this version of Steem that another window appears, this is the main debug window. It displays the contents of memory locations and data/address registers.
Right press “Stop” in the debug window or hit the yellow arrow in the main Steem window to pause emulation.
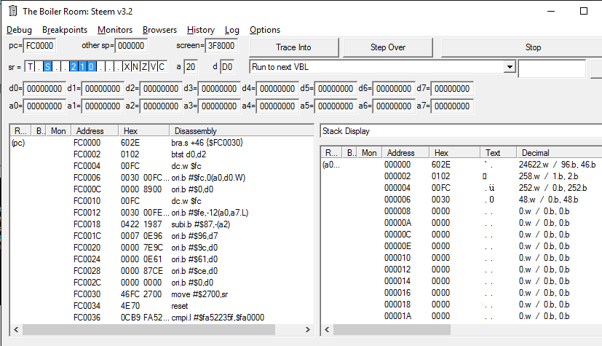
The Steem debug windows should now look something like this :-
What this is showing is the current state of the system when we paused the game. You will notice that PC (Program Counter) = $47f28. This shows the current instruction that is about to be executed (at memory location $47f28). You can also see the contents of the 8 data and address registers. E.g. data register 5 (D5) =$3c0.
You will normally find that when you pause a game the current instruction is either the start of the VBL or an instruction with another timer. As I mentioned earlier, the VBL is normally where the music routine is executed from.
So is $47f28 the VBL routine? Well let’s find out. On the drop downs click on “Browsers”, then “New Memory Browser” in the memory address window at the very top left type $70 then return.
The memory browser will look like this (note some addresses may be different depending on your TOS and memory settings within Steem)

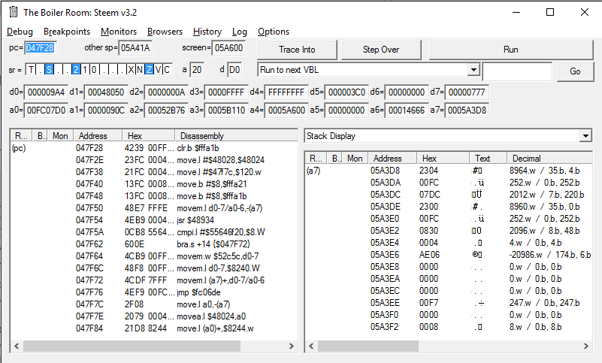
We know the VBL address is stored at location $70 in memory (the Steem disassembly column actually describes what many of the memory addresses are, in this case 68000 Level 4 interrupt VBL). So we can see the routine it is executing is stored at $47f28. So we can now be confident that the code at $47f28 is run every 50th of a second (assuming you are using a European ST).
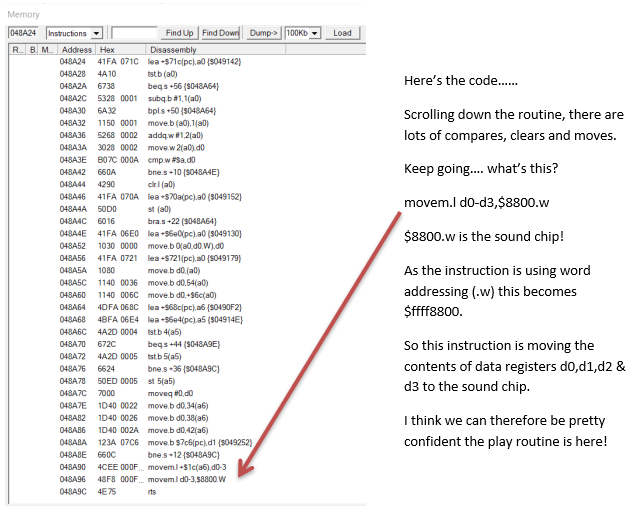
Right let’s take a closer look at the code located at $47f28 though I won’t go into the specifics of each instruction.
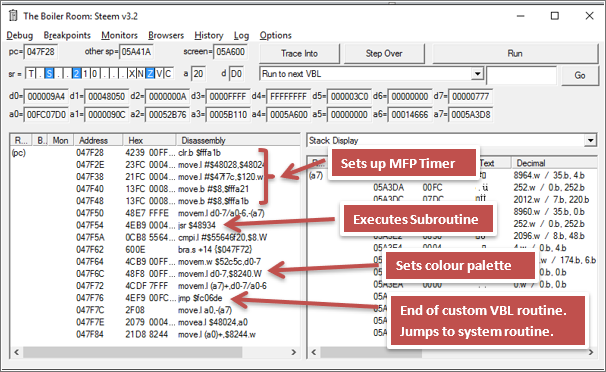
So looking at the above instructions none appear to be accessing the sound chip ($ffff8800 - $ffff8802). The only unknown factor is what is happening in the sub routine (JSR $48934).
Well, once again add a memory browser window (Browser > New Memory Browser) and enter $48934 as the start address.
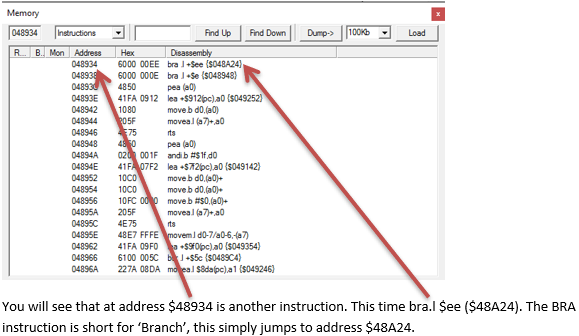
You will see that at address $48934 is another instruction. This time bra.l $ee ($48A24). The BRA instruction is short for ‘Branch’, this simply jumps to address $48A24.
So, once again change the memory address in the browser to $48A24.
So, is that it? Not quite, as I mentioned most music routines have an initialisation routine as well as the play routine, plus many have exit routines too. So now we need to find the init rout! Luckily most drivers, though not all, have a series of BRA’s (branch instructions), or JMP’s (jump instructions) at the beginning of the music driver which go to each if the routines, thanks Jochen!
Let’s go back to the original BRA called by the VBL routine.
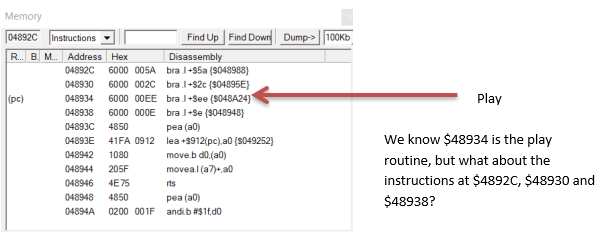
As I mentioned earlier most init routines take the value in d0 and use this to select the tune number. Well, let us check each….
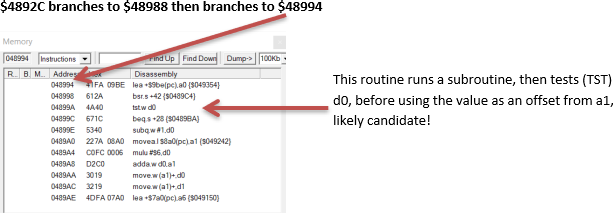
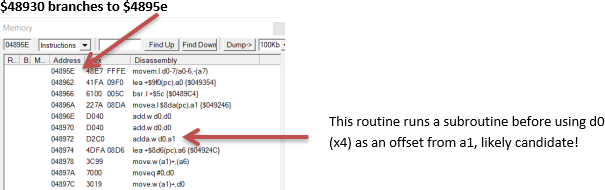
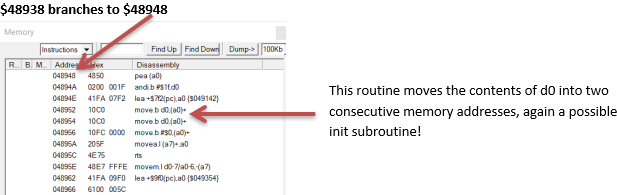
So we are no further forward, any of the 3 routines could be the init routine. Well time to do some testing!
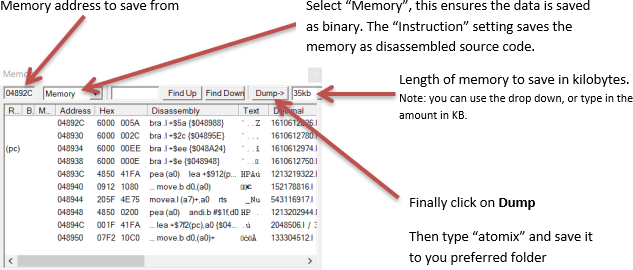
So now we need to save the binary data to a file to test. To do this we use the dump function within Steem. In MonST, memory can be saved similarly using the save function (“S” on the keyboard), more of that later.
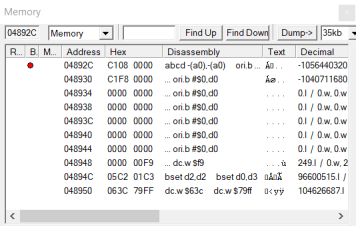
But where should we save from? And how much memory do we need to save? Well, we are pretty confident that the play routine is at $48934, however the init could be any of the other 3 addresses. So to be on the safe side we will save from the lower memory address which is $4892c. The length is trickier, from experience most chip music files are under 35kb. Therefore we will save a 35kb chunk of memory from $4892c.
You now have a possible music file on your hard-drive. Now to test and hopefully create your first SNDH file! I have created a floppy ST image containing the tools needed to create and test your SNDH.
Download this file boot Steem with the file in Drive A.
The disk should boot to desktop.
Next double click on genst2.prg , this is the Devpac assembler.
Now we want to test our music file, so click on file >> load >> test1.s
This is a very basic assemble program to test our music file.
We have given our binary music file the label “music”. As you can see the program goes into supervisor mode, this is so we can access hardware directly. Then we save the current VBL routine and install our own. At this point the music should play, then we wait for a key press then exit.
Note you will see we do BSR (branch subroutine) +8 in our VBL routine. This is because we saved data from $4892c but we think the play routine is located at $48934 ($48934-$4892c = 8). So want to run the routine at music+8.
Ok, next we need to tell Steem where we saved the atomix binary file, note Steem Debug automatically adds the DMP extension to save files (from Dump).
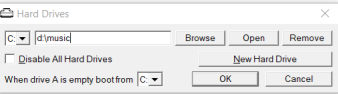
So imagine you saved the file to D:musicatomix.dmp, we need to set up a virtual hard drive pointing to this folder. So within Steem click on the Disk Manager Icon
Next click on Hard Drives, then map C:to your PC folder containing atomix.dmp
Ok, let’s try and assemble this. Press ALT and A to assemble
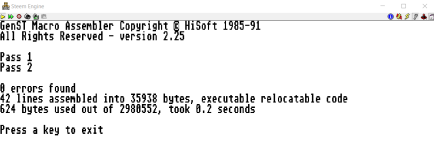
Now to test! Press a key after assembly , then press ALT and X (to execute our program)
You should see something like :-
Oh dear! Not good!
Let’s look again at the source. Ahhh we are not running the initialise routine, we are simply running the play routine. As well as setting up sub tunes most init routines also set up tables and pointers. No wonder it didn’t work!
Ok now load up test2.s
This time we have added an initialise routine call (bsr music) , well we think it is that routine (+0). Remember it could also be $48930 (+4) or $48938 (+$c)
Right let us try now…..
Assemble/Execute - Silence but no bombs!
Now change the bsr music to bsr music+4 – bombs!
Finally change to music+$c – bombs!!
So it appears running music+0 (the first BRA routine) stops the music from crashing but we are hearing no sound :(
Now a golden rule. When ripping music always try to save the music before the music has initialised. If you remember we froze the Atomix music whilst it was playing, so the init routine will have already been executed.
Ok, so we need to freeze the game before init. How? Well… we think the init routine is at $4892c, so Steem gives us a nifty feature which stops emulation at any instruction (a breakpoint). Let’s try that!
Within Steem open the memory browser and go to address $4892C. Now click in the “B” column to set a break point (a red dot appears). This means Steem will now stop if an instruction at $4892C is executed.
On main boiler room menu ensure “Stop On Breakpoints” is selected!
Now we need to reboot Steem with the Atomix image in the drive again. NOTE remember to switch off hard-drives in Steem (“Disable All Hard Drives” in the hard drive menu). This makes sure the program loads at the same address as originally.
This time when you run Atomix it should break , showing “Hit breakpoint at address $04892C”. This means we have caught the player before it inits!
Click ok and save the memory as before (35kb from $4892C)
Now reboot Steem and load genst2 and assemble test2.s again (remember to turn hard-drives back on!)
Execute….and….. ta da…. the title music should be playing! Well done :)
At this point you have reached the level of most 80s/90s music rippers, however one small step left. To make the music into an SNDH file. SNDH began life as a simple wrapper thought up by BDC of Aura (hi Jochen!), later myself and Evil progressed the format and continue to do so!
The SNDH header is basically the music you have just ripped with information tagged onto the front, such as music title, composer and number of subtunes.
All SNDH’s use the same initial structure :
BRA initialise +0
BRA exit       +4
BRA play       +8
So if you check test3.s I have added a basic SNDH header, you will notice it’s very similar to the original test2.s play routine. The only major difference is that we execute via the sndh label as opposed to the music label.
More info regarding the SNDH header can be found at the official SNDH site.
Right last lap….
To save the SNDH file we need to save data between the “sndh” label and the “endsndh” label. The easiest way is via MonST. So assemble the source code as normal (ALT-A)
However this time press ALT-D (to debug). This allows you to step through the code. All we need to do is save the data between those two labels… so press “S” to save, then type atomix.snd (filename)
For the “start address,end” enter sndh,endsndh-1
This will save the SNDH file!
Control C out to devpac
And Quit back to GEM
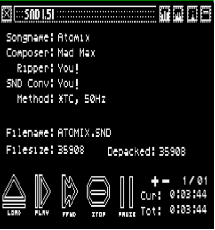
Now to test…. Double click on snd_player.prg
And load your SND file :)
That’s just a basic SNDH, the finished article would need a proper exit routine (muting the sound chip) and also the file would need trimming to the correct length (35kb is way too long!) but this is just a taster.
Phew… that’s quite a lengthy explanation. But now you can see how it’s done. Have a play around and experiment. Any comments, help etc. to me via the SNDH blog or via Facebook or twitter
Next time, if there is a next time, I may cover more advanced topics like, non PC-relative tunes, MFP, XBIOS, multi-hz tunes, shadow registers, swapping MFP timers, making tunes OS friendly and adding sid voices to classic YM tunes.
Thanks to ggn/d-bug/küa and tronic/effect for testing this tutorial.
grazey/psycho hacking force - SNDH administrator
April 2020
Comments
Comments powered by Disqus